
I like writing my own HTML and CSS. There is nothing wrong with frameworks, but getting something done the custom way often includes writing custom markup and styles.
The CMS I’m working now with is TYPO3 and even though I can get quite a lot of things done with their ready made components (text, text with images etc.) I came to the point of needing a wrapper for my elements (you know, to make CSS Grid work its magic you need a parent with children and you need to identify at least the parent with a CSS selector). So I asked my CMS nicely “Can I have a wrapper, please?” and my CMS answered “No”, so I asked another question: “If you cannot get me a wrapper on your own, maybe someone has taught you that already? Some extension for example?” and I started looking for an extension to get the job done. After some time I have found Grid Elements and there was only one more task for me at that point – tell the Grid Element to create me a wrapper. Let’s have a look at it now.
Prerequisites
I needed:
- my working TYPO3 installation (at that point it was 10.4.9)
- Grid Elements 10.0.0 extension installed and running
Having that I could start coding my own extension.
Extension setup
Note: In this article I intend to write an extension to use in this one project only, so I don’t cover making it repository-ready or highly configurable. It’s a small helper just for me.
First navigate to typo3conf/ext. Create a folder and choose a name for your extension (I have chosen “test”).
Now create a file, that will let TYPO3 know, that your extension exists. This file is called ext_emconf.php and sits directly in your
extension’s folder. Content of this file looks like this:
<?php

$EM_CONF[$_EXTKEY] = [
  'title' => 'Test',
  'description' => 'Test package',
  'category' => 'templates',
  'author' => 'Kasia',
  'author_email' => 'info@kasia.website',
  'author_company' => 'Kasia',
  'version' => '1.0.0',
  'state' => 'stable',
  'constraints' => [
    'depends' => [
      'typo3' => '10.4.0-10.4.99',
      'fluid_styled_content' => '10.4.0-10.4.99',
      'gridelements' => '10.0.0-10.99.99',
    ],
    'conflicts' => [
    ],
  ],
  'uploadfolder' => 0,
  'createDirs' => '',
  'clearCacheOnLoad' => 1
];
Our extension needs another packages to work (typo3, fluid_styled_content and gridelements). First two are included with installation and the third extension needs to be installed manually.
Save and go to admin area -> Admin Tools -> extensions and have a look at the list. You should be able to see the title you have put in ext_emconf.php in column “extension” and name of your folder in column “key”.
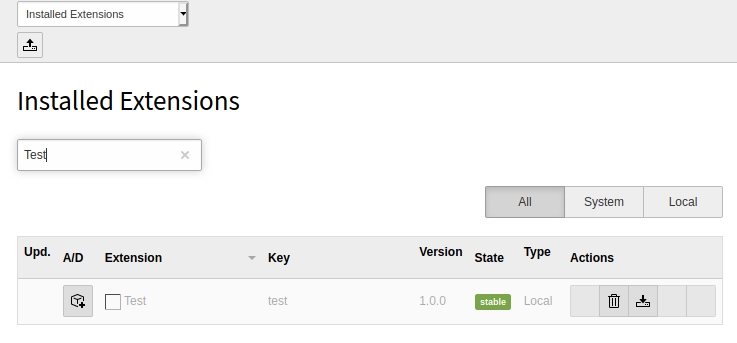
The extension is now inactive – click the icon in column “A/D” to activate it.
Now we will do the configuration needed to make our extension work.
Create file Configuration/TCA/Overrides/sys_template.php. This file will be loaded by default and is not referenced anywhere inside the extension, so this is very important to not make any typos in folder or file names. This file contains following code:
<?php

defined('TYPO3_MODE') || die();

call_user_func( function() {
/**
* Extension key
*/
$extensionKey = 'test';

/**
* Default TypoScript
*/
\TYPO3\CMS\Core\Utility\ExtensionManagementUtility::addStaticFile(
  $extensionKey,
  'Configuration/TypoScript',
  'Test'
);

});
this is standard code, that can be copied form extension to extension without modification much modification – just adjust $extensionKey and last parameter in addStaticFile.
Create a file ext_localconf.php in your extension’s folder and put
following code inside:
<?php
if (!defined('TYPO3_MODE')) { die('Access denied.'); }

call_user_func( function ($extConfString) {
// Add pageTS config
\TYPO3\CMS\Core\Utility\ExtensionManagementUtility::addPageTSConfig('<INCLUDE_TYPOSCRIPT:
source="FILE:EXT:test/Configuration/TypoScript/pageTs/tsconfig.ts">');

},$_EXTCONF
);
We will store our configuration in
Configuration/TypoScript/pageTs/tsconfig.ts. Remember to replace “test” with your extension’s main folder name.
The content of Configuration/TypoScript/pageTs/tsconfig.ts looks like this:
tx_gridelements {
  setup {
    wrapper {
      title = test
      description = wrapping element
      topLevelLayout = 0
      config {
        colCount = 1
        rowCount = 1
        rows.1.columns.1 {
          colPos = 0
        }
      }
    flexformDS = FILE:EXT:test/Configuration/FlexForm/flexform.xml
    }
  }
}
which translates into: get the tx_gridelements (configuration of
gridelements) and extend it as follows: We want to have a new element “wrapper” (name inside “setup“) and we want it to
display it’s name (title=”wrapper“) in admin area. If we
wanted to adjust this name for different languages this would be the right place to do it. For now we will hard code the value. We want to use our element as top element (topLevelLayout = 0) an contain one row (rowCount = 1) and one column (colCount = 1). This single column (first column in first
row = rows.1.columns.1) of content should work with default layout, so we
define colPos = 0.
To configure what an admin will see when he tries to interact with our elment will be in file Configuration/FlexForm/flexform.xml. Remember to adjust the directory FILE:EXT:test/Configuration/FlexForm/flexform.xml) to match your extension’s name.
In Configuration/FlexForm/flexform.xml we write the following:
<T3DataStructure>
  <sheets>
    <rowClasses>
      <ROOT>
        <TCEforms>
          <sheetTitle>custom classes</sheetTitle>
        </TCEforms>
        <type>array</type>
        <el type="array">
          <rowCustom type="array">
            <TCEforms type="array">
              <label>classes</label>
              <config type="array">
                <type>input</type>
                <eval>trim</eval>
              </config>
            </TCEforms>
          </rowCustom>
        </el>
      </ROOT>
    </rowClasses>
  </sheets>
</T3DataStructure>
Our wrapper will allow admin to set any class to the wrapping element. We will refer to that class later as “rowCustom“.
We need one last config to make it work –
Configuration/TypoScript/setup.typoscript with following contents:
tt_content.gridelements_pi1 {
  templateRootPaths {
  11 = EXT:test/Resources/Private/Templates/
  }
}
It will tell the rendering engine to use our template files.
That was the configuration. Now we need to write our template.
Template
Create file /Resources/Private/Templates/Standard/Wrapper.html The name of this file should be the same as the name in
Configuration/TypoScript/pageTs/tsconfig.ts inside setup but first letter
should be uppercased. Content of this file looks as follows:
<html xmlns:f="http://typo3.org/ns/TYPO3/CMS/Fluid/ViewHelpers"; data-namespace-typo3-fluid="true">
<f:layout name="Default"/>
<f:section name="Main">
<f:if condition="{children}">
<div class="{data.flexform_rowCustom}">
<f:for each="{children}" as="columns" key="rowNumber">
<f:if condition="{columns}">
<f:for each="{columns.0}" as="child">
<f:render partial="Child" arguments="{data: child.data, children: child.children, options: options, settings: settings}"/>
</f:for>
</f:if>
</f:for>
</div>
</f:if>
</f:section>
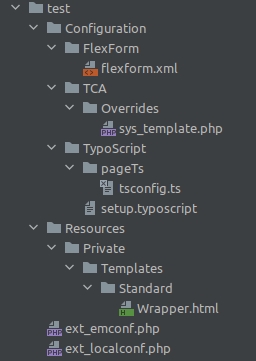
</html>Your plugins structure now should look like this:
Admin area
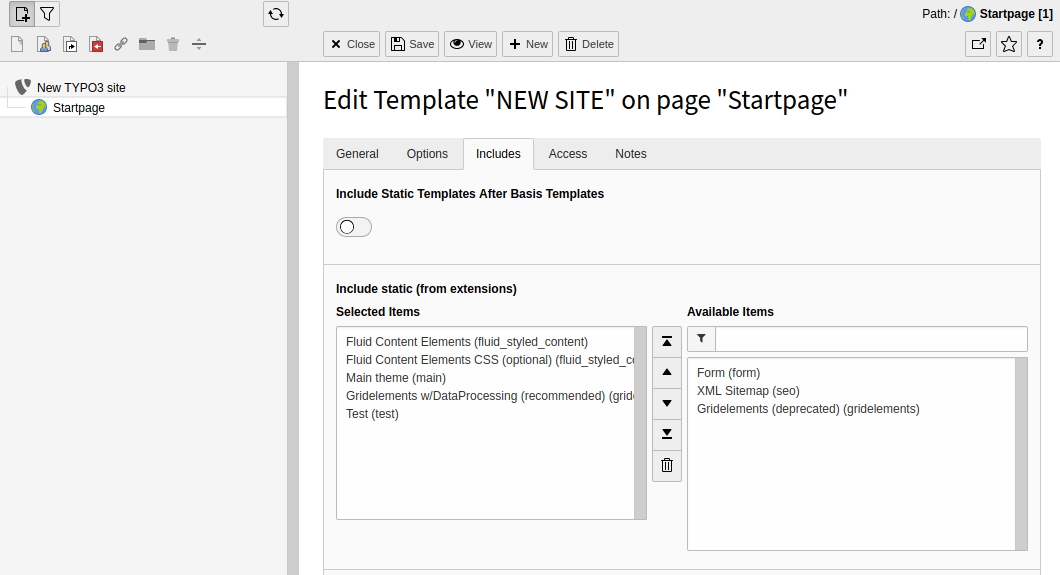
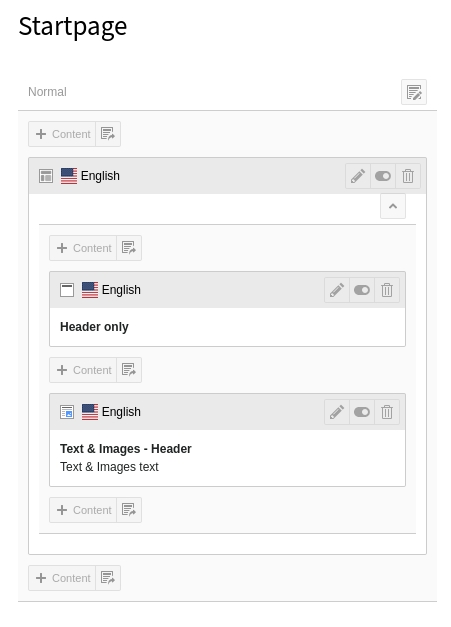
Now let’s switch to admin area. Go to web -> Template and select
your main template. You should be in Info/Modify mode. Click “Edit the whole template record” button and go to “Includes” tab. You should see your extension in the right column. Move it to the left column by clicking on it and make sure it is after “Gridelements”. Now save.
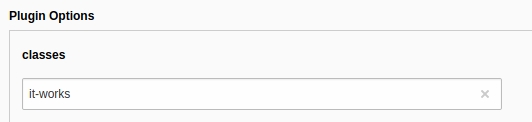
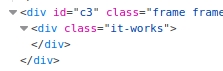
Empty cache and hard reload the page. Navigate to web -> Page and choose any site. If you try to add new content element, you should see in last tab (“Grid Elements”) your widget. Click on it. You can set a custom class to make sure it shows up in browser:
Now you can go to front end and inspect your page. Unless you have defined some default styles the wrapper element won’t be visible by default.
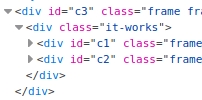
Now you can switch back to admin view and add as many elements to your container as you like.
Save and go to front end again. The HTML looks like this:
Congratulations!
Final thoughts
Because the wrappers can be nested, at this point you can create as complicated HTML structure as you wish and add to it any classes that you need. The only problem is that this will always be only divs. If you need uls, lis or anything else you need another solution.
Having this setup you can also create templates with more complicated HTML structure and default classes to deliver a set of predefined templates (a kind of block builder with jumbotron, card and timeline elments). You can define multiple elements in a single extension by adding more entries in Configuration/TypoScript/pageTs/tsconfig.ts, their form configuration in Configuration/FlexForm/flexformNewElement.xml and templates in /Resources/Private/Templates/Standard/NewElement.html. If you have problems have a look at bootrap extension.
Further resources: