
This is a continuation of an article about generating snowflakes with plain javascript. In the first part we went through the process of creating a desired snowflake with SVG and ended up with a static result representing an example snowflake. Today we’ll write some javascript to make creating snowflakes interactive.
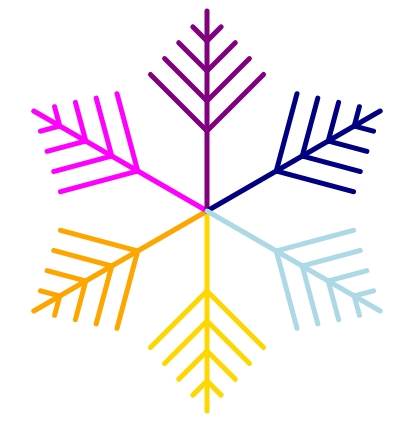
As a reminder, here are the image we to generate and its code:
<svg id="snowflake" viewBox="-100 -100 200 200" width="200" height="200">
    <defs>
        <g id ="v">
            <path vector-effect="non-scaling-stroke"
                  transform="rotate(45)"
                  d="M0,0v1"/>
            <path vector-effect="non-scaling-stroke"
                  transform="rotate(-45)"
                  d="M0,0v1"/>
        </g>
        <g id="arm"
              stroke-width="5"
              stroke-linecap="round">
              <path vector-effect="non-scaling-stroke" d="M0,0v100"/>
              <use href="#v" transform="translate (0 40) scale(40)"/>
              <use href="#v" transform="translate (0 55) scale(30)"/>
              <use href="#v" transform="translate (0 70) scale(20)"/>
              <use href="#v" transform="translate (0 85) scale(10)"/>
        </g>
    </defs>
    <use href="#arm" transform="rotate(0)" stroke="gold" />
    <use href="#arm" transform="rotate(60)" stroke="orange" />
    <use href="#arm" transform="rotate(120)" stroke="fuchsia" />
    <use href="#arm" transform="rotate(180)" stroke="purple" />
    <use href="#arm" transform="rotate(240)" stroke="navy" />
    <use href="#arm" transform="rotate(300)" stroke="lightblue" />
</svg>
Events
Making something interactive on the web requires understanding of two concepts – event listeners and handlers.
Event listeners tell the browser when to do something and handlers tell the browser what to do.
Our snowflake generator should start drawing new lines when the user presses a point on a base snowflake’s arm and make the lines grow until the point gets released. The events needed to achieve this behavior are:
mousedowntouchstartmouseuptouchend
mousedown and touchstart
If we want to handle a click we use the same event both on devices operated by touch and by pointer (e.g. mouse), so why do we need two different events to do something when a click just starts? Well, it’s because of the nature of the input. If you have a pointer like mouse you can click exactly one point at the time and get a set of two coordinates – x and y. But if you operate by touch you can put all of your fingers on the screen at once and the decision how to handle those multiple points activated at once has to be made in code – in touchstart event’s handler.
To add those handlers we write following lines of javascript:
const svg = document.getElementById('snowflake');

svg.addEventListener('mousedown', function(event) {});

svg.addEventListener('touchstart', function(event) {});
First we get our target – svg – using document.getElementById and call the function addEventListener on it with two parameters. The first parameter is event’s name (mousedown or touchstart) and second parameter is a function to be executed when the event takes place. The functions are anonymous and take one parameter – event. We could name those functions and reformat the code like this:
const svg = document.getElementById('snowflake');

const handleMouseDown = function(event);
const handleTouchStart = function(event);

svg.addEventListener('mousedown', handleMouseDown);

svg.addEventListener('touchstart', handleTouchStart);
It makes the code more descriptive and has one more potential advantage. When we name our event handlers we can remove them later using removeEventListener function, which would not work with anonymous handler functions.
In this case we do not plan to remove the callback functions, so we’ll stick with the first version. One more thing worth noticing for new developers is that the callback functions are not being called here – there are no braces behind functions’ names. That’s because we don’t want the code to be executed when the browser parses our event listeners, but to be run every time the event get fired.
Now that we know how to add the event listeners we can take care of event handling itself.
const svg = document.getElementById('snowflake');

const startDrawing = function(clientX, clientY) {};

svg.addEventListener('mousedown', function(event) {
    startDrawing(
        event.clientX,
        event.clientY
    );
});

svg.addEventListener('touchstart', function(event) {
    startDrawing(
        event.touches[0].clientX,
        event.touches[0].clientY
    );
});
To draw new lines we need to know where to start drawing, so we need the coordinates. When it comes to mousedown event we get them by calling event.clientX and event.clientY. When the touchstart event gets fired, we get a list of touches with all the points that got activated and choose only the first one (event.touches[0]) and read the coordinates of this point with event.touches[0].clientX and event.touches[0].clientY.
mouseup and touchend
Before we get to any handler’s contents we’ll add two more event listeners for mouseup and touchend events:
const endDrawing = function(event){};
svg.addEventListener('mouseup', endDrawing);
svg.addEventListener('touchend', endDrawing);
They will take care of all the operations we need to do when the user releases the point on a screen.
Handling events
With the event listeners set up we can define what exactly we want to happen when the handlers get called. To make the code as simple as possible all the variables will be declared globally.
Firstly let’s define the startDrawing function handling adding new crystals to the snowflake:
const svg = document.getElementById('snowflake');
const arm = document.getElementById('arm');

const startLength = 1;
let length = startLength;

let max = 100;
let offset = 0;

let v = undefined;
let keepGrowing = undefined;

const startDrawing = function(clientX, clientY) {
    //calculate position
    const offsetX = svg.getBoundingClientRect().x;
    const offsetY = svg.getBoundingClientRect().y;

    const width = svg.getBoundingClientRect().width;
    const height = svg.getBoundingClientRect().height;

    let point = {
        x: clientX - offsetX - 0.5 * width,
        y: clientY - offsetY - 0.5 * height
    };

    offset = Math.sqrt(point.y * point.y + point.x * point.x) * 200 / height;
    offset = Number.parseFloat(offset).toFixed(2);
    length = startLength;

    //create new element
    let tmp = document.createElementNS('http://www.w3.org/2000/svg',"use");
    tmp.setAttribute('href', '#v');
    tmp.setAttribute('transform', 'translate(0 ' + offset + ') scale(' + length + ')');
    arm.insertAdjacentElement('beforeend', tmp);

    //setup growing
    max = 100 - offset;
    v = tmp;
    keepGrowing = setInterval(grow, 25);
};
The function does three things: firstly, it calculates the placement of the new element, then it creates the element inside svg and finally it sets up the function “growing” the crystal.
Calculating the position is done using some simple math to get rid of offsets created by positioning of the svg on the screen so that we operate on the numbers inside the svg element.
It’s important to remember, that the center the svg has coordinates (0,0) so we only need to calculate distance between the clicked point and (0,0) to know where to start drawing. We can use Pythagorean theorem to do this – clicked point’s x and y coordinates are the length of the legs adjacent to the right angle and our searched offset is the hypotenuse.
Then we scale the calculated value to the current dimensions of the svg by multiplying the result by 200 (svg’s height in its internal units – last value in viewBox attribute) and dividing by the height in pixels. To keep the values we output in svg code we round the result with toFixed.
Creating new element is straightforward when we understand the method described in the previous post.
In the last part we save current values to the global variables (max and v) and setInterval to call grow function every 25 milliseconds. The grow function is defined as follows:
const endDrawing = function() {
    clearInterval(keepGrowing);
    v = undefined;
}

const grow = function() {
        if (!v || length >= max) {
            endDrawing();
        }

        length += step;
        v.setAttribute('transform', 'translate(0 ' + offset + ') scale(' + length + ')');
    }
If for some reason the crystal (v) is undefined or we have reached the maximum length we want to allow, we clear the interval so that the grow function won’t be called any more. Otherwise we increase the length of a crystal and update the svg. Note, that the endDrawing function is the function we call on mouseup and touchend events.
And that’s it. If you wan to see it in action visit my snowflake generator.